Tips and Tricks for Smart Courses for Confluence
What’s better than having all you need in one place? We thought of you before collecting these tips and tricks from the marketing team and support team.
This is the guide that you turn to when you need advice on dealing with specific features.
This blog serves different tips and tricks for Smart Courses for Confluence to help you find your way out easily when going through the app’s different features.
The content of this blog is updatable whenever new features are released.
Tricks:
Image capsule: If Non-HTTPS image links don’t display, here’s what you can do. Upload the image to your desktop and then insert it in the course as an image.
Video capsule: If Non-HTTPS video links don’t display, you can opt for these alternatives.
- 1st alternative: download the video like MP4 to your desktop and insert it as a video in the course.
- 2nd alternative: put the link in a text capsule or a Confluence page.
- 3rd alternative: copy-paste the embedded code of the video and add it to the HTML capsule. Here’s how you can do it with a Youtube video.
Quiz questions capsule: If it’s a text answer question, it’s not enough to write the question’s title. It will not appear for the attendee. You have to select question details and write extra details. That way, you’ll have the title, and the details appear.

Web page capsule: The display of some external web pages may be blocked by their hosting domains. In that case, you can copy-paste the web page’s content into a Confluence page and then insert it in the course, or you can take a screenshot of that web page, upload it as an image capsule, and add the direct link to the description.
PDF capsule: Links for PDF files from non-HTTPS domains may not display. The easy alternative is to download the pdf and add it as an attachment.
Catalog logo: Since Smart Courses for Confluence imposes specific dimensions (72×72 pixels) to the catalog logo, here’s a trick you can do to have the exact dimensions. Go to Figma or any other tool, create a frame, customize the dimensions to 72×72 pixels, then import your logo to that frame, and voilà! Here you have it.
Allow contributors enrollment: This is a newly released feature that can be used as a trick for course creators to have their own sessions by not only previewing the course but also by attending it the same way as an attendee and like that they can track their metrics.
Continuous assignment: It’s a trick not to waste your time and do the same task more than once, assigning the same course to each newly added user. Instead, you just schedule the assignment. In other words, add the user to the group you already assigned the course to, and it will automatically be assigned to that attendee.
Tips:
Text capsule: The text capsule supports text and images, but in case you need a richer text editor and want to make edits on your images, you can use the Confluence page capsule as an alternative since it supports complex pages thanks to Smart Images for Confluence, the all in one image toolkit.
Hide questions results: You cannot use the below 2 options when you already selected hide questions results in the configuration menu. Even though you wrote the customized messages, they’ll still not appear.
- Custom right answer message
- Custom wrong answer message
The hide questions results feature is useful for the exam mode, and it’s better to apply it when the attendee has more than 1 attempt.
Exam mode course: You should put a minimum pass score and maximum exam attempts for more accurate metrics.

Course list macro: This is a feature provided by default when you install Smart Courses for Confluence. You can insert a list of courses in the Confluence page that the attendees can refer to just by clicking on the required course.
Reset session: If you want to grant the attendee a second chance in an exam or a second go through to a course and want to have the metrics updated, you just have to reset the user session from the course metrics, or you can make your custom procedure where you can use an API of Smart Courses to reset all sessions of any course.
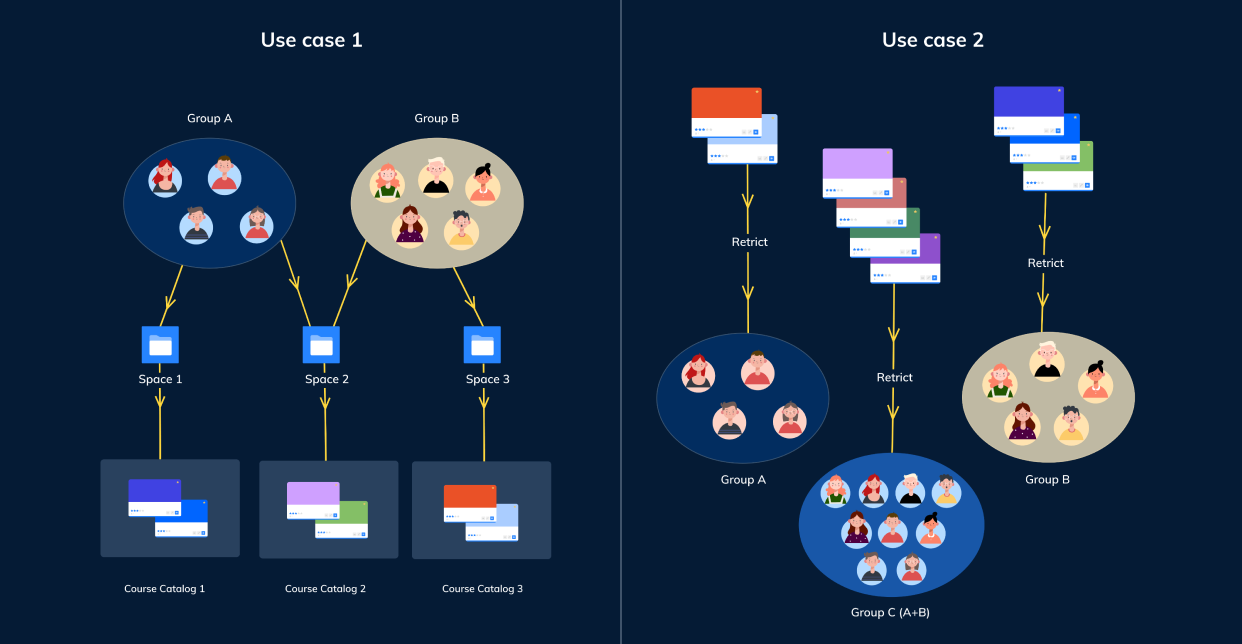
Restrictions: Smart Courses for Confluence has the same logic as Confluence spaces and pages in terms of permissions. This means that users who have the right to view a specific space also can view the courses within it. Suppose you don’t want all users to view those courses. You have 2 possibilities demonstrated in 2 use cases.
1st use case:
You manage 2 departments, but sometimes you don’t want them to view the same content.
Create 3 spaces and 2 groups: one for each department (group) and a cross-department space.
2nd use case:
You’re the human resources director, and you have information to share in courses with 3 departments, but you only want 1 space. Create 3 groups within that space.
Group1: Sales department
Group2: Marketing department
Group3: both teams in a common group
Now, add restrictions depending on who needs to attend the course.
You can rely on the illustration below to visualize the use cases or watch our Youtube tutorial on how to add restrictions.
Sum up:
Smart Courses for Confluence provides a great variety of features and gives you alternatives in case one of them doesn’t suit your use case. We tried to give you every alternative possible in this blog post, but you can always find other possibilities depending on your use case.
Check our Youtube How-Tos.
Confluence