SQL views to query large Confluence datasets

A Confluence table may start simple, but as your data grows, so do the questions.
Filtering, sorting, grouping, and pivot tables can handle a lot. But when you need more specific views, combined conditions, or custom summaries, SQL gives you another way to work with the same data.
With Smart Tables for Confluence, you can convert your native Confluence tables into Smart Tables and create SQL Views directly from them. And if you don’t know SQL, AI Mode can generate the query for you.
Let’s see how it works.
TL; DR
Start with an existing native Confluence table or Smart Table. If you’re using a native table, convert it to a Smart Table first. Then open + View, select SQL table, and query your data using SQL.
Smart Tables references your source table as T1, and the query result appears as its own view while staying connected to the same source data.
Don’t know SQL? Switch to AI Mode, describe the result you want in plain language, and Smart Tables generates the query for you.
Can you use SQL with a native Confluence table?
Not directly.
Native Confluence tables are great for organizing information, documenting processes, or keeping lightweight trackers inside a page.
But a native table doesn’t provide an SQL editor where you can run something like:
SELECT Task, Team, Owner, Priority, Status, Due Date
FROM T1
WHERE Priority = 'High'
AND Status = 'Open'
AND Due Date <= CURRENT_DATE + INTERVAL 14 DAY
ORDER BY Due Date ASC;
Smart Tables adds that layer.
Instead of rebuilding the data elsewhere, you can convert your existing native Confluence table into a Smart Table and keep working with the information already on your page.
From there, you can use familiar Smart Tables features such as filters, sorting, grouping, formulas, pivot tables, and charts or create an SQL View when the question gets more specific.
So, let’s start from the beginning.
Step 1: Start with your Confluence table
Imagine you’re managing a project tracker in Confluence with columns such as:
- Task
- Team
- Owner
- Priority
- Status
- Due Date
- Budget
For normal day-to-day work, this table might be perfectly manageable. You can read through the rows, update statuses, and use Confluence as the shared place where the team keeps the latest information.
However, the problem arises when different people need different answers from the same SQL table. A Project Manager may want to see only open high-priority work. A team lead may want to know which team has the most open tasks. Finance may only care about budget totals. You could create separate tables for each need.
But now you have multiple versions of the same data to maintain. Instead, let’s keep one source table and query it.
Step 2: Convert your native Confluence table to a Smart Table
If your data is inserted inside a Smart Table macro, you can skip this step.
If you’re starting with a native Confluence table, you don’t need to recreate it manually.
Open the Smart Tables menu from the page header and select Convert to Smart Table.
The Table converter will show the tables available on the page. Select the one you want to convert and save your changes.
Your existing Confluence table is now a Smart Table, which means you can work with the same data while adding more advanced table features.
This is an important part of the workflow: you’re enhancing the table you already have rather than starting again somewhere else.
Step 3: Create your first SQL View
Now open your Smart Table from the Confluence page viewer.
From the + View menu, select SQL table. A new SQL table is created from your Smart Table data, and its edit mode opens automatically. One detail you’ll need to know before writing anything:
Your source Smart Table is referenced in SQL as:
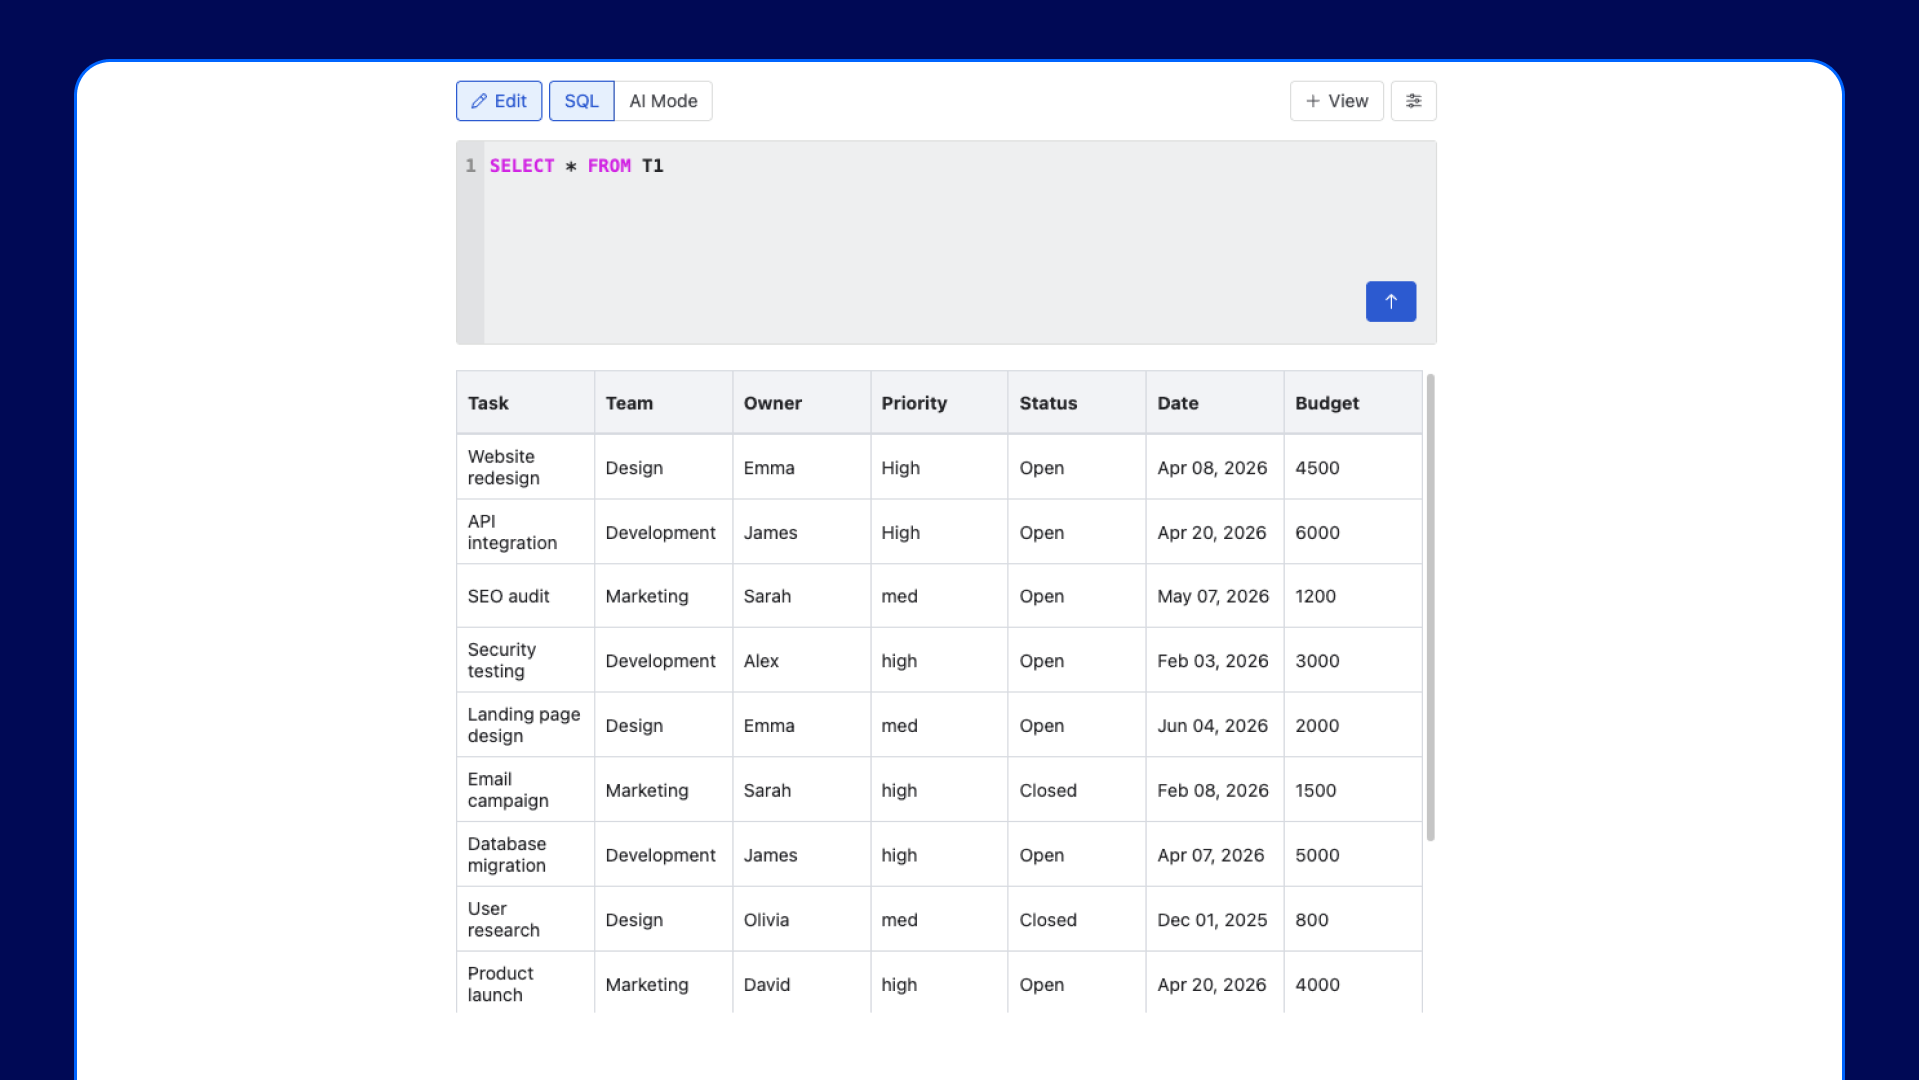
So instead of querying the table by its page title or Smart Table name, your query uses FROM T1. Let’s try a simple example. Suppose we want to see every high-priority task that is still open:
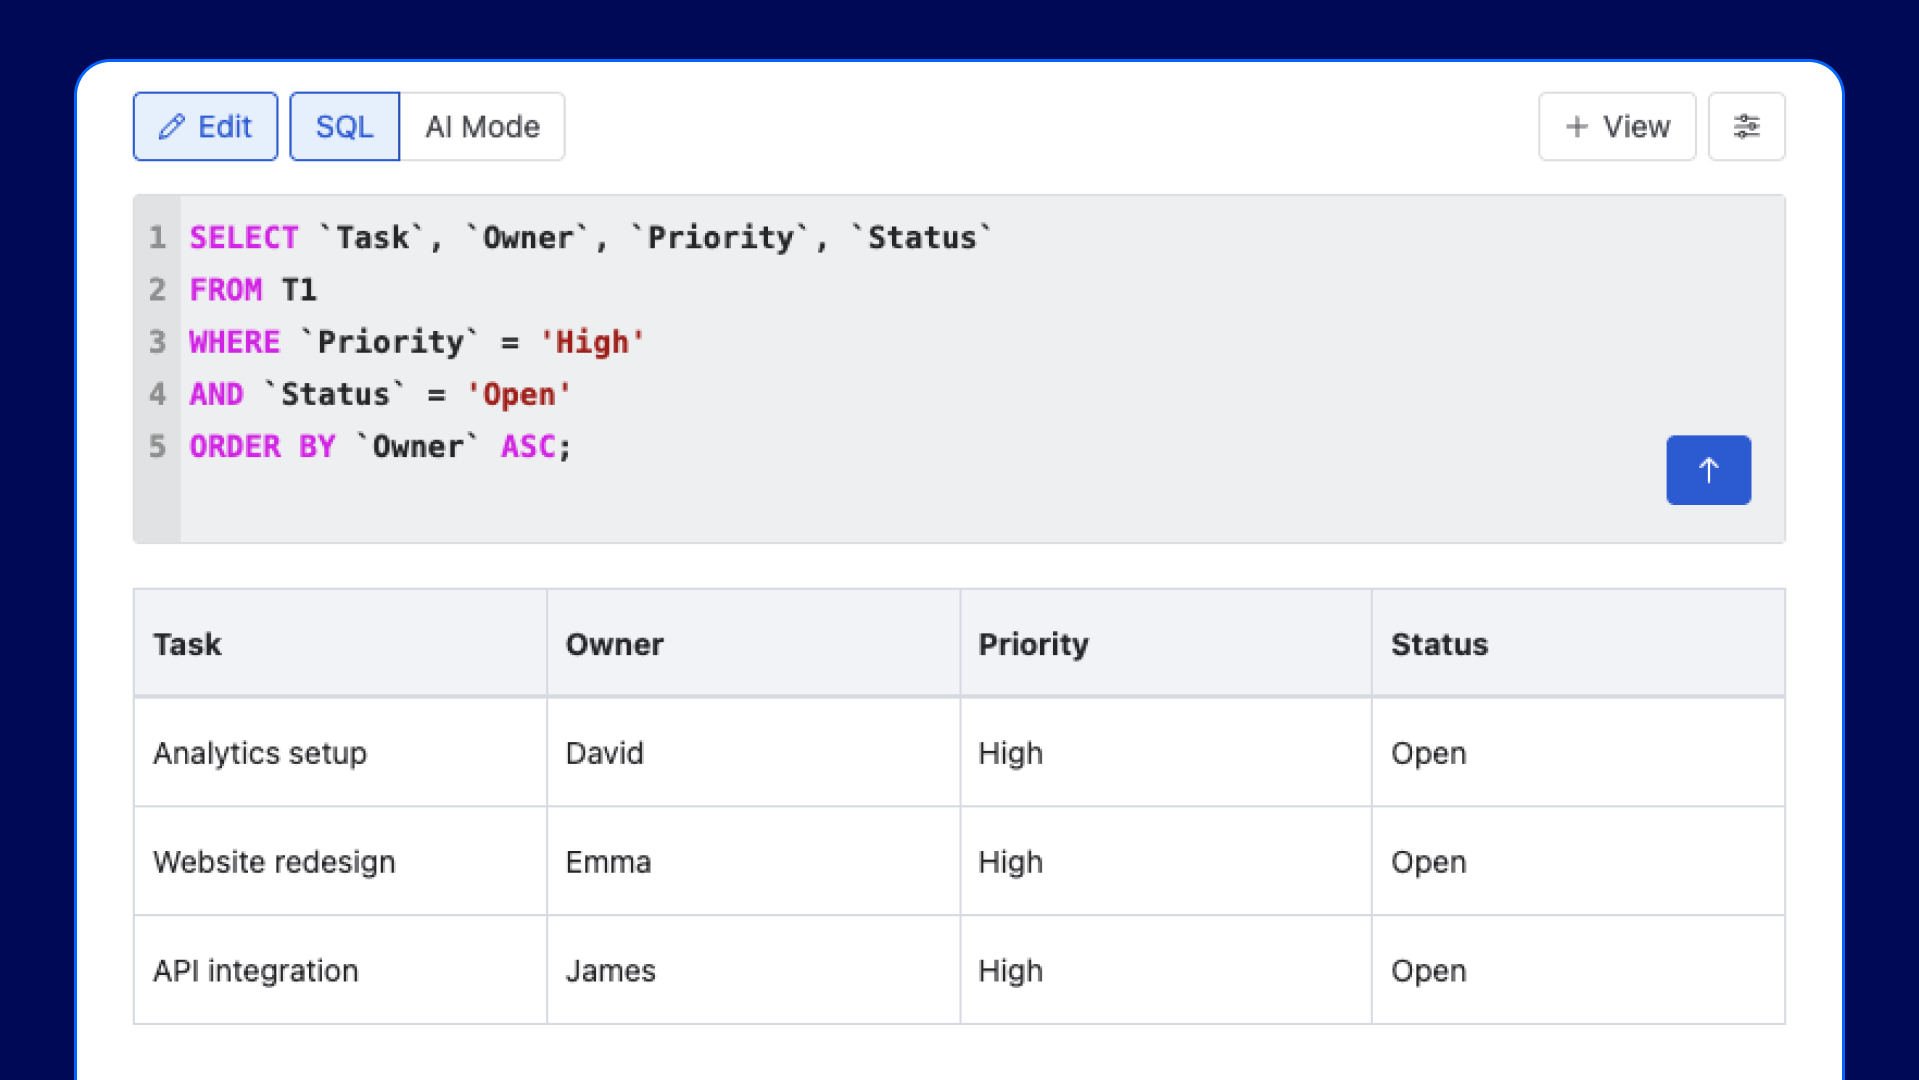
Click Run Query. The result appears directly below the SQL editor.
Instead of changing the source Smart Table, you’ve created a focused view answering one particular question. As the source data changes, the SQL table stays connected.
Step 4: Understand what the query is actually doing
If you’re not very familiar with SQL, the query above can look more intimidating than it really is.
SELECT decides which columns you want to see. FROM T1 tells Smart Tables which source data you’re querying. WHERE defines the conditions the rows must meet. AND lets you combine more than one condition. ORDER BY decides how the final results should be arranged.
So this:
WHERE `Priority` = 'High'
AND `Status` = 'Open'
simply means:
Only show rows where the task is both high priority and open.
That’s where SQL becomes particularly useful. Instead of manually combining several filters every time you need an answer, you can define the exact conditions in one query and keep the result as its own view.
One more thing to remember: Smart Tables references column names using backticks in SQL queries.
For example:
`Due Date`
or:
`Daily Budget ($)`
Step 5: Go beyond filtering and summarize your Confluence table
SQL isn’t only another way to filter rows.
You can also use it to summarize the information inside your Smart Table.
Let’s say you want to know how many high-priority open tasks each team currently has.
Instead of returning every individual task, you can ask SQL to count them:
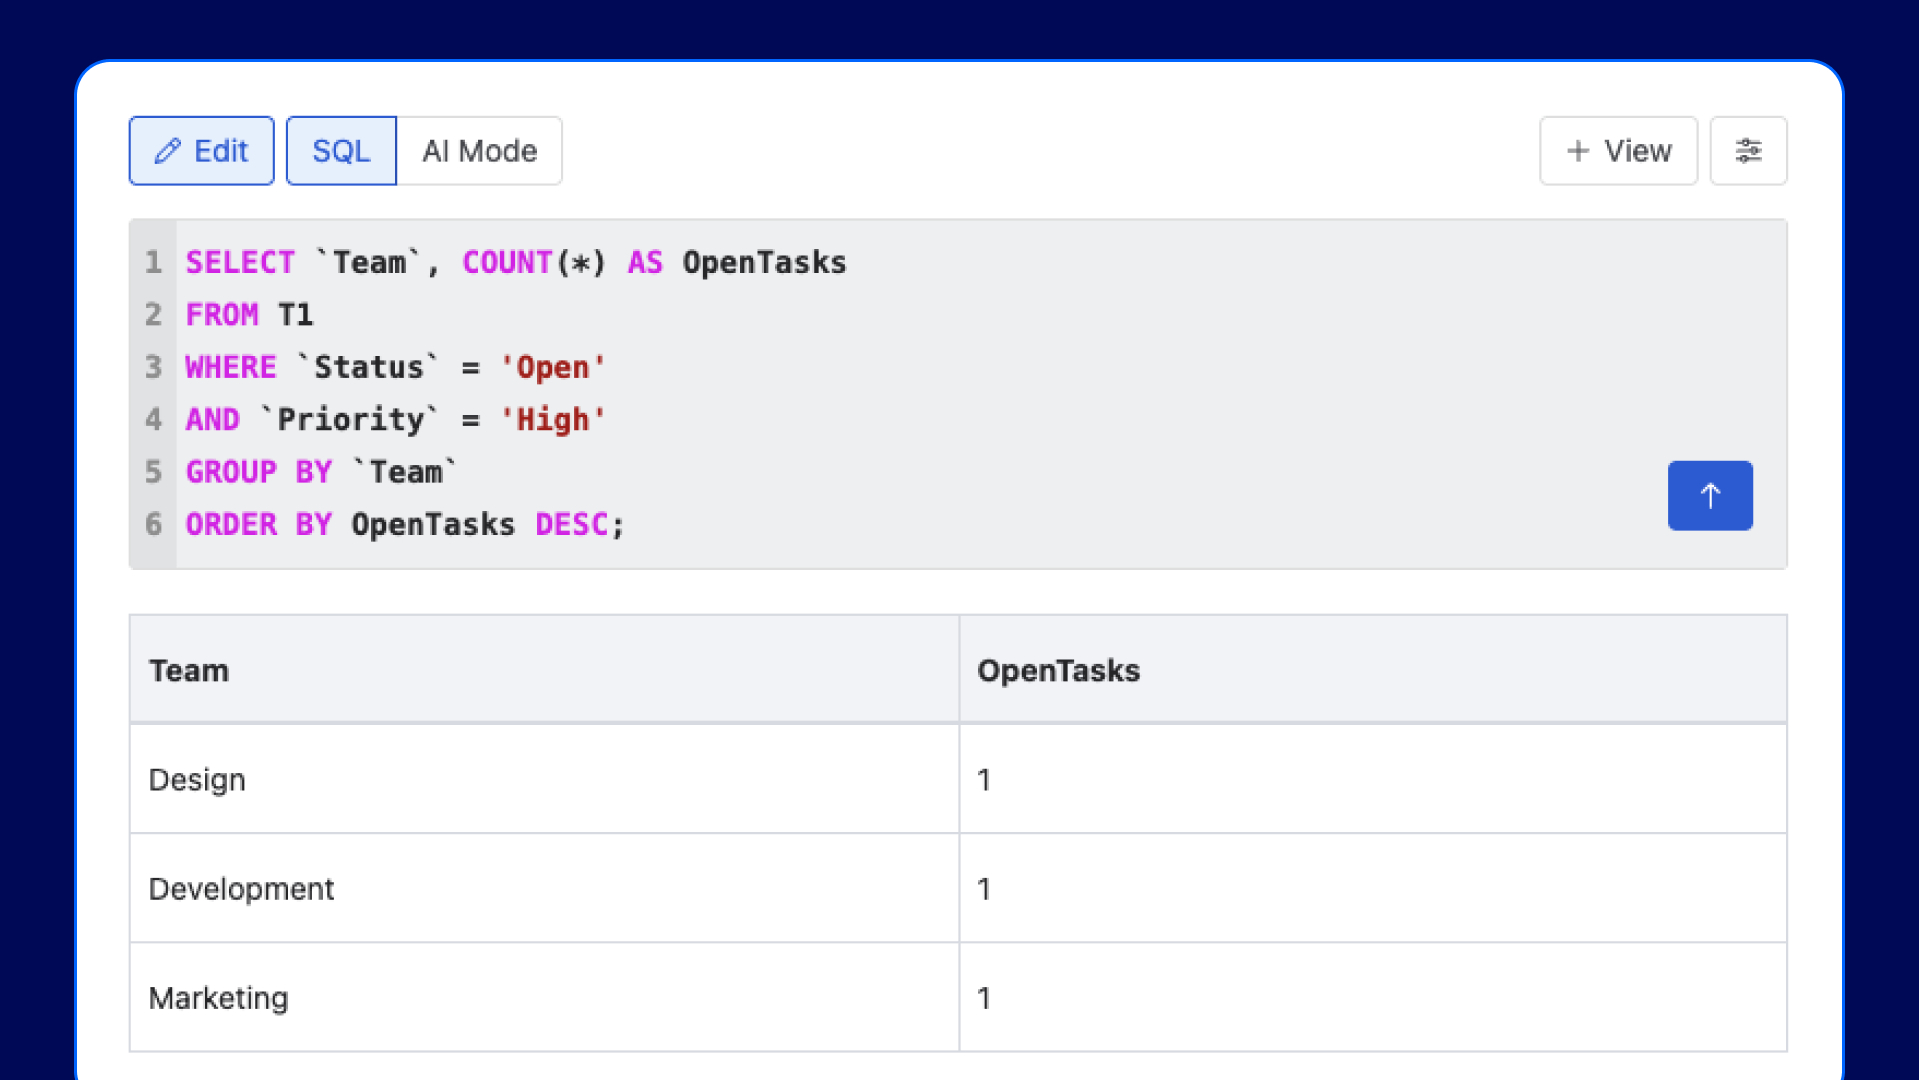
Now your detailed project tracker becomes a simple summary showing the number of open, high-priority tasks per team.
You can use the same approach to answer other questions, such as identifying which team has the most tasks assigned or comparing workloads across teams.
For example, to count the total number of tasks assigned to each team:
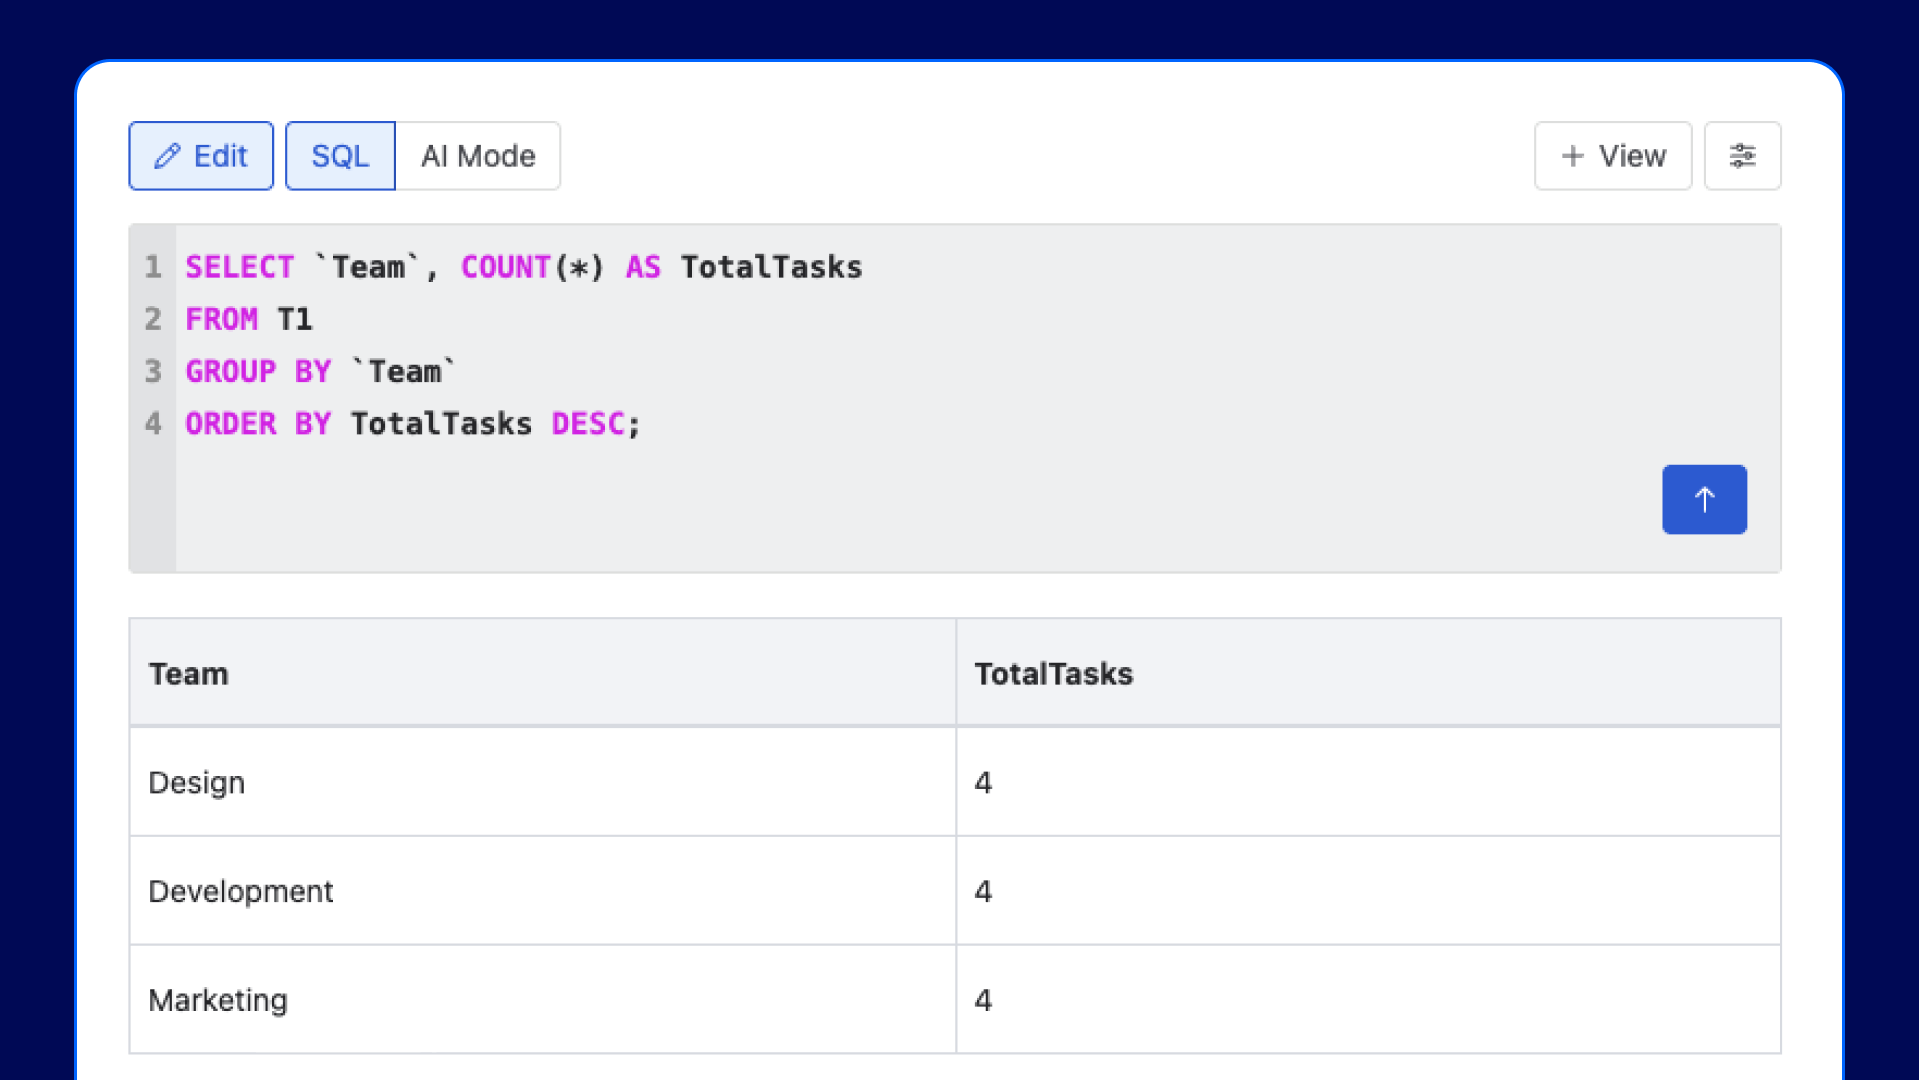
This gives you a breakdown of tasks by team, ordered from the highest to the lowest.
Your original Smart Table remains unchanged. You’re simply creating another view of the same data.
Step 6: Don’t know SQL? Use AI Mode
This is the part that makes SQL Views useful beyond technical teams. You don’t necessarily need to write the query yourself. From the SQL table toolbar, switch from SQL to AI Mode. Instead of writing code, describe the result you’re looking for in plain language. For example:
“Count all open high-priority tasks by team and show the teams with the highest number first.”
Run the request. Smart Tables generates the SQL query based on your table and your instructions. The SQL editor then opens automatically so you can see both the generated query and its result. That means AI Mode doesn’t completely hide the SQL. You can review what was generated, use it as-is, or adjust it if needed. It can also be a good way to learn.
Ask for something in plain language, review the SQL it produces, change the request, and see how the query changes.
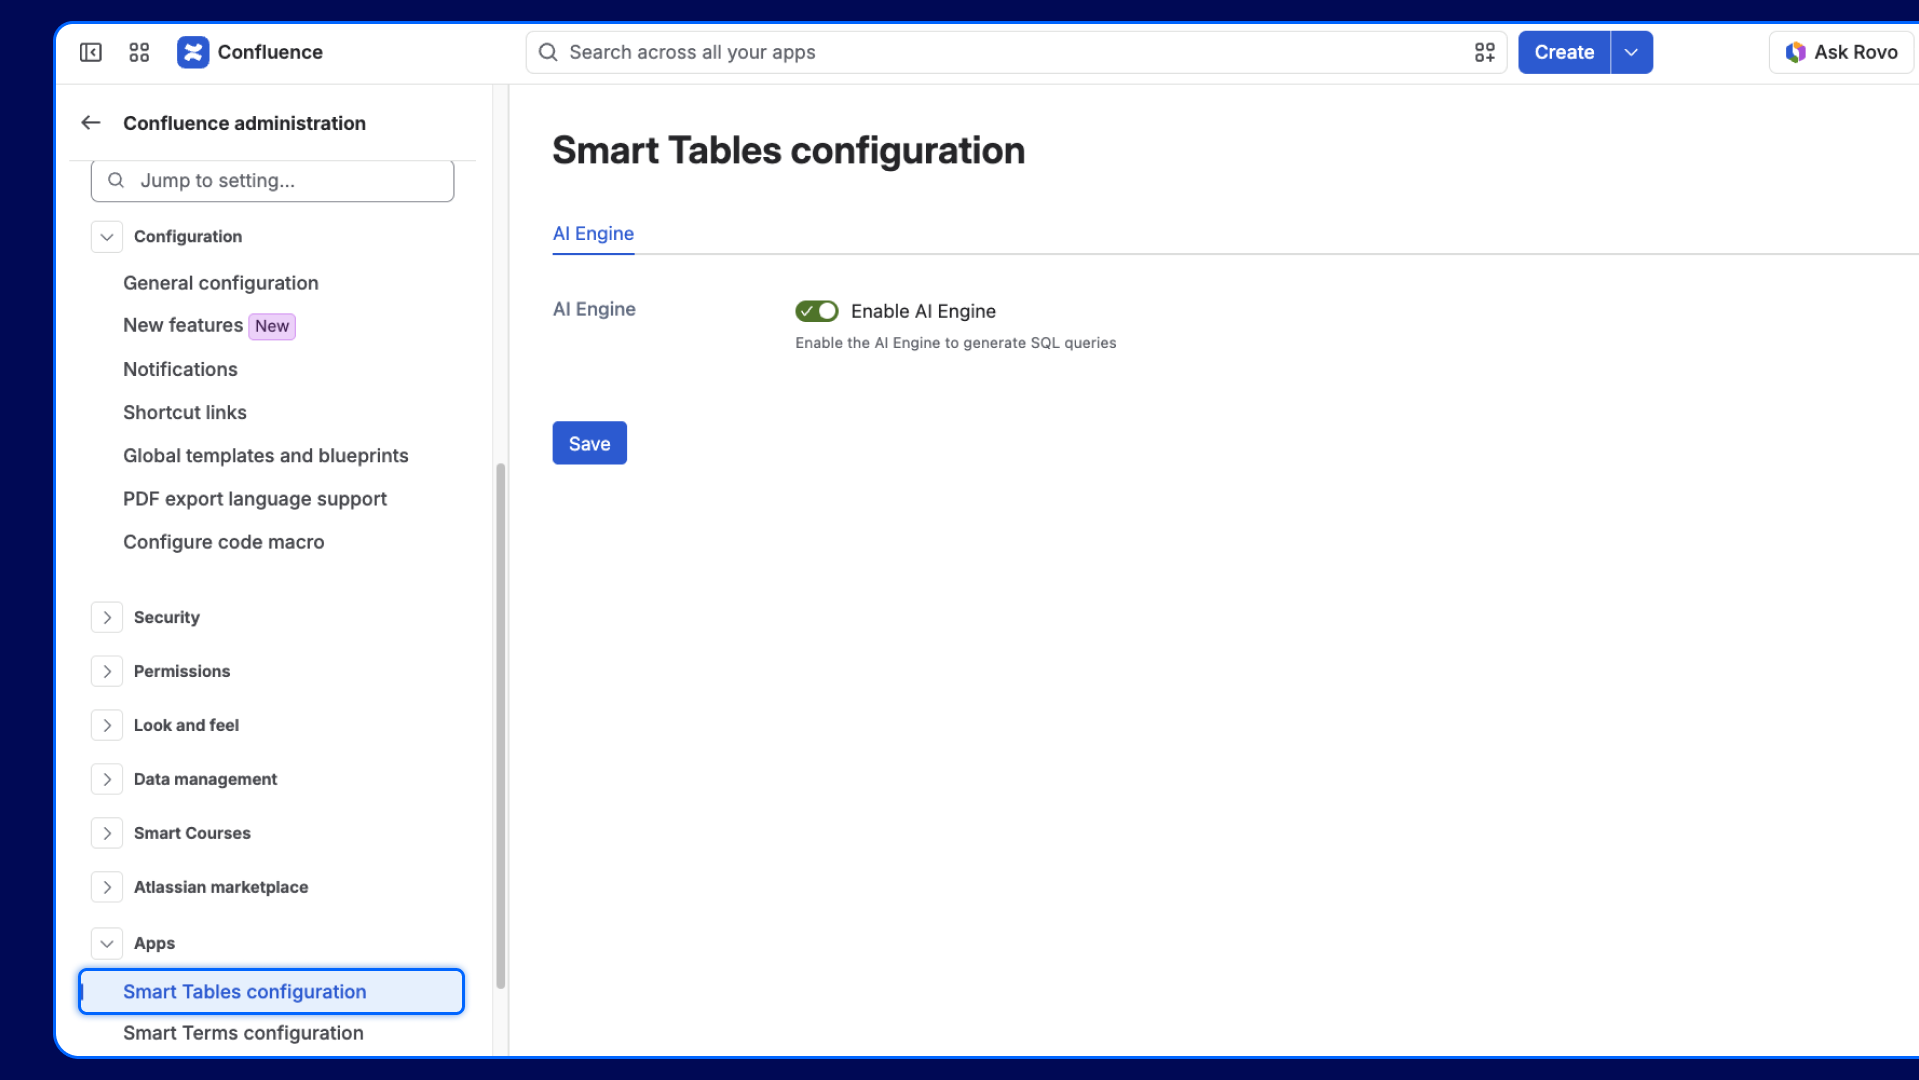
If you don’t see AI Mode, the AI Engine is controlled from Confluence administration → Apps → Smart Tables configuration. A Confluence administrator can manage the setting from there.
And as with any AI-generated output, review the query and its results before relying on it for important reporting.
Step 7: Create different views without creating different source tables
Your main Smart Table can remain the source of truth while different SQL Views answer different questions.
Instead of duplicating the source table for every reporting need, create multiple SQL Views from the same underlying data. When the source data changes, those views stay connected.
And because SQL is another Smart Tables view type, it can sit alongside your Table, Pivot Table, and Chart views instead of moving reporting into another tool.
A few details that will save you time
Create and edit SQL tables from the page viewer: SQL tables are created from the Confluence page viewer, and inline editing lets you adjust your SQL View directly without going back to the regular Confluence page editor.
Use T1 for your source data: If your query can’t find the table, make sure you’re referencing the Smart Table as T1.
Check AI Engine settings if AI Mode is missing: The setting is managed by a Confluence administrator under the Smart Tables configuration.
Review AI-generated queries: AI Mode helps you create a starting point quickly, but your wording and table structure affect what it generates.
Save your Smart Table changes: When you’re finished creating or adjusting the SQL table, use the Smart Table Save button so the changes are stored for page viewers.
There is also one behavior worth remembering when duplicating content: SQL tables aren’t copied automatically when a Confluence page is copied, so they need to be added again on the copied page.
From a Confluence table to an answer
A table doesn’t become less useful as it grows.
Usually, people just start asking more complicated questions.
Native Confluence tables give teams a simple place to structure and share information. Smart Tables add more ways to work with that information through filters, formulas, grouping, pivot tables, charts, and now SQL.
When a normal filter answers the question, use the filter.
When you need to combine conditions, calculate totals, group results, or build reusable reporting views from the same source data, create an SQL View.
And when you know the question but not the SQL, describe what you need in AI Mode and let Smart Tables create the first query for you.
ConfluenceLearningOnboarding